[ROKID] CXR-M development - Device connection
![[ROKID] CXR-M development - Device connection](/temple.webp)
1. Device Bluetooth Connection API
1.1. Required Permissions
The Rokid glasses connection process relies on BLE scanning (for device discovery) + Bluetooth Classic (for Socket communication) . Therefore, the following permissions need to be configured in AndroidManifest.xml:
private val REQUIRED_PERMISSIONS = mutableListOf(
    Manifest.permission.ACCESS_FINE_LOCATION,
    Manifest.permission.BLUETOOTH,
    Manifest.permission.BLUETOOTH_ADMIN,
).apply {
    if (Build.VERSION.SDK_INT >= Build.VERSION_CODES.S) {
        add(Manifest.permission.BLUETOOTH_SCAN)
        add(Manifest.permission.BLUETOOTH_CONNECT)
    }
}.toTypedArray()
1.2. Finding Bluetooth Devices (BLE Scanning)
Rokid Glasses can be identified through BLE broadcast. The official recommendation is to use UUID filtering:
00009100-0000-1000-8000-00805f9b34fb
1.2.1. Getting the BLE Scanner
val manager = getSystemService(Context.BLUETOOTH_SERVICE) as BluetoothManager
val adapter = manager.adapter
val scanner = adapter.bluetoothLeScanner
1.2.2. Setting Up Scan Filter (Rokid Fixed UUID)
val filter = ScanFilter.Builder()
    .setServiceUuid(ParcelUuid.fromString(“00009100-0000-1000-8000-00805f9b34fb”))
    .build()
val filters = listOf(filter)
1.2.3. Setting Scan Parameters
val settings = ScanSettings.Builder()
    .setScanMode(ScanSettings.SCAN_MODE_LOW_LATENCY)
    .build()
1.2.4. Starting the Scan
scanner.startScan(filters, settings, object : ScanCallback() {
    override fun onScanResult(type: Int, result: ScanResult) {
        Log.d(“BLE”, “Found device: ${result.device.name}”)
    }

    override fun onScanFailed(errorCode: Int) {
        Log.e(“BLE”, “Scan failed: $errorCode”)
    }
})
1.2.5. Stopping the Scan
scanner.stopScan(scanCallback)
1.3. Bluetooth Initialization and Pairing (Init Bluetooth)
Rokid device pairing needs to be done through the SDK interface. Using system settings for direct pairing is not recommended.
Initialization interface:
fun initBluetooth(context: Context, device: BluetoothDevice, callback: BluetoothStatusCallback)
Callback example:
CxrApi.getInstance().initBluetooth(context, device, object : BluetoothStatusCallback {

    override fun onConnectionInfo(
        socketUuid: String?,
        macAddress: String?,
        rokidAccount: String?,
        glassesType: Int,
    ) {
        // After obtaining socketUuid + macAddress, you can proceed with connectBluetooth
    }
})
🔍 Notes and Personal Understanding:
- Each time the glasses enter pairing mode → a new
socketUuidis generated- The purpose of
initBluetooth()is to initiate a pairing process and obtain thesocketUuid+ Classic Bluetooth MAC- It’s recommended to persist the obtained data, e.g., in SharedPreferences:
socketUuid,macAddress- Next time, you don’t need to pair again and can directly use
connectBluetooth
1.4. Connecting to Bluetooth Communication Service (connectBluetooth)
SDK 1.0.1:
fun connectBluetooth(
    context: Context,
    socketUuid: String,
    macAddress: String,
    callback: BluetoothStatusCallback
)
SDK 1.0.3 / 1.0.4 (new authentication parameters added): snEncrypt (authentication file) and clientSecret (secret key)
See the end of this document for how to obtain the authentication file and secret key.
fun connectBluetooth(
    context: Context,
    socketUuid: String,
    macAddress: String,
    callback: BluetoothStatusCallback,
    snEncrypt: ByteArray,
    clientSecret: String
)
Parameter explanation:
| Parameter | Type | Description |
|---|---|---|
context | Context | Application context |
socketUuid | String | Socket UUID obtained from initBluetooth |
macAddress | String | MAC address obtained from initBluetooth |
callback | BluetoothStatusCallback | Connection status callback |
snEncrypt | ByteArray | Authentication file content (new in 1.0.3 / 1.0.4) |
clientSecret | String | Client secret key (new in 1.0.3 / 1.0.4) |
After successful connection, you can call:
CxrApi.getInstance().getGlassInfo()
This is used to get the glasses status information.
1.5. Getting Bluetooth Connection Status
CxrApi.getInstance().isBluetoothConnected
Returns a Boolean indicating whether the glasses are in a connected state.
1.6. Bluetooth Release / Disconnect
fun deinitBluetooth()
Used when exiting the application or switching device scenarios.
2. Complete Connection Flow
- Put the glasses into pairing mode
- BLE scan to find the glasses device
- Call
initBluetooth()to initiate pairing- Obtain
socketUuid+macAddress - Recommended to save locally to support subsequent connections
- Obtain
- Call
connectBluetooth()to establish communication connection - After successful connection, you can get glasses information
- After disconnection, listen to broadcasts for automatic reconnection
3. Bluetooth Disconnection and Auto-Reconnection Mechanism
Register Bluetooth connection broadcast listener:
class BluetoothConnectReceiver : BroadcastReceiver() {

    override fun onReceive(context: Context, intent: Intent) {
        when (intent.action) {
            BluetoothDevice.ACTION_ACL_CONNECTED -> {
                val device = intent.getBluetoothDevice()
                // Check if it’s a Rokid device -> initiate reconnection with connectBluetooth
            }
        }
    }
}
⚠️ Important Notes (Very Important)
- When calling
initBluetooth, you must not register the auto-reconnection broadcast- Otherwise, the system may not show the pairing dialog, which will result in never being able to pair successfully
Broadcast registration method:
private val bluetoothReceiver = BluetoothConnectReceiver()

registerReceiver(bluetoothReceiver, buildFilter())
unregisterReceiver(bluetoothReceiver)
4. v1.0.3 / v1.0.4 Authentication File and Secret Key Acquisition
Step 1: Login/Register on Rokid Developer Platfrom https://ar.rokid.com/control?lang=en
Step 2: Perform Real Name verification https://account-web.rokid.com/verify
As EU citizen I’ve used my driving licence to complete KYC.
Go to Developer Platform → Account Center → Real Name Verification → GET to get the secret key.
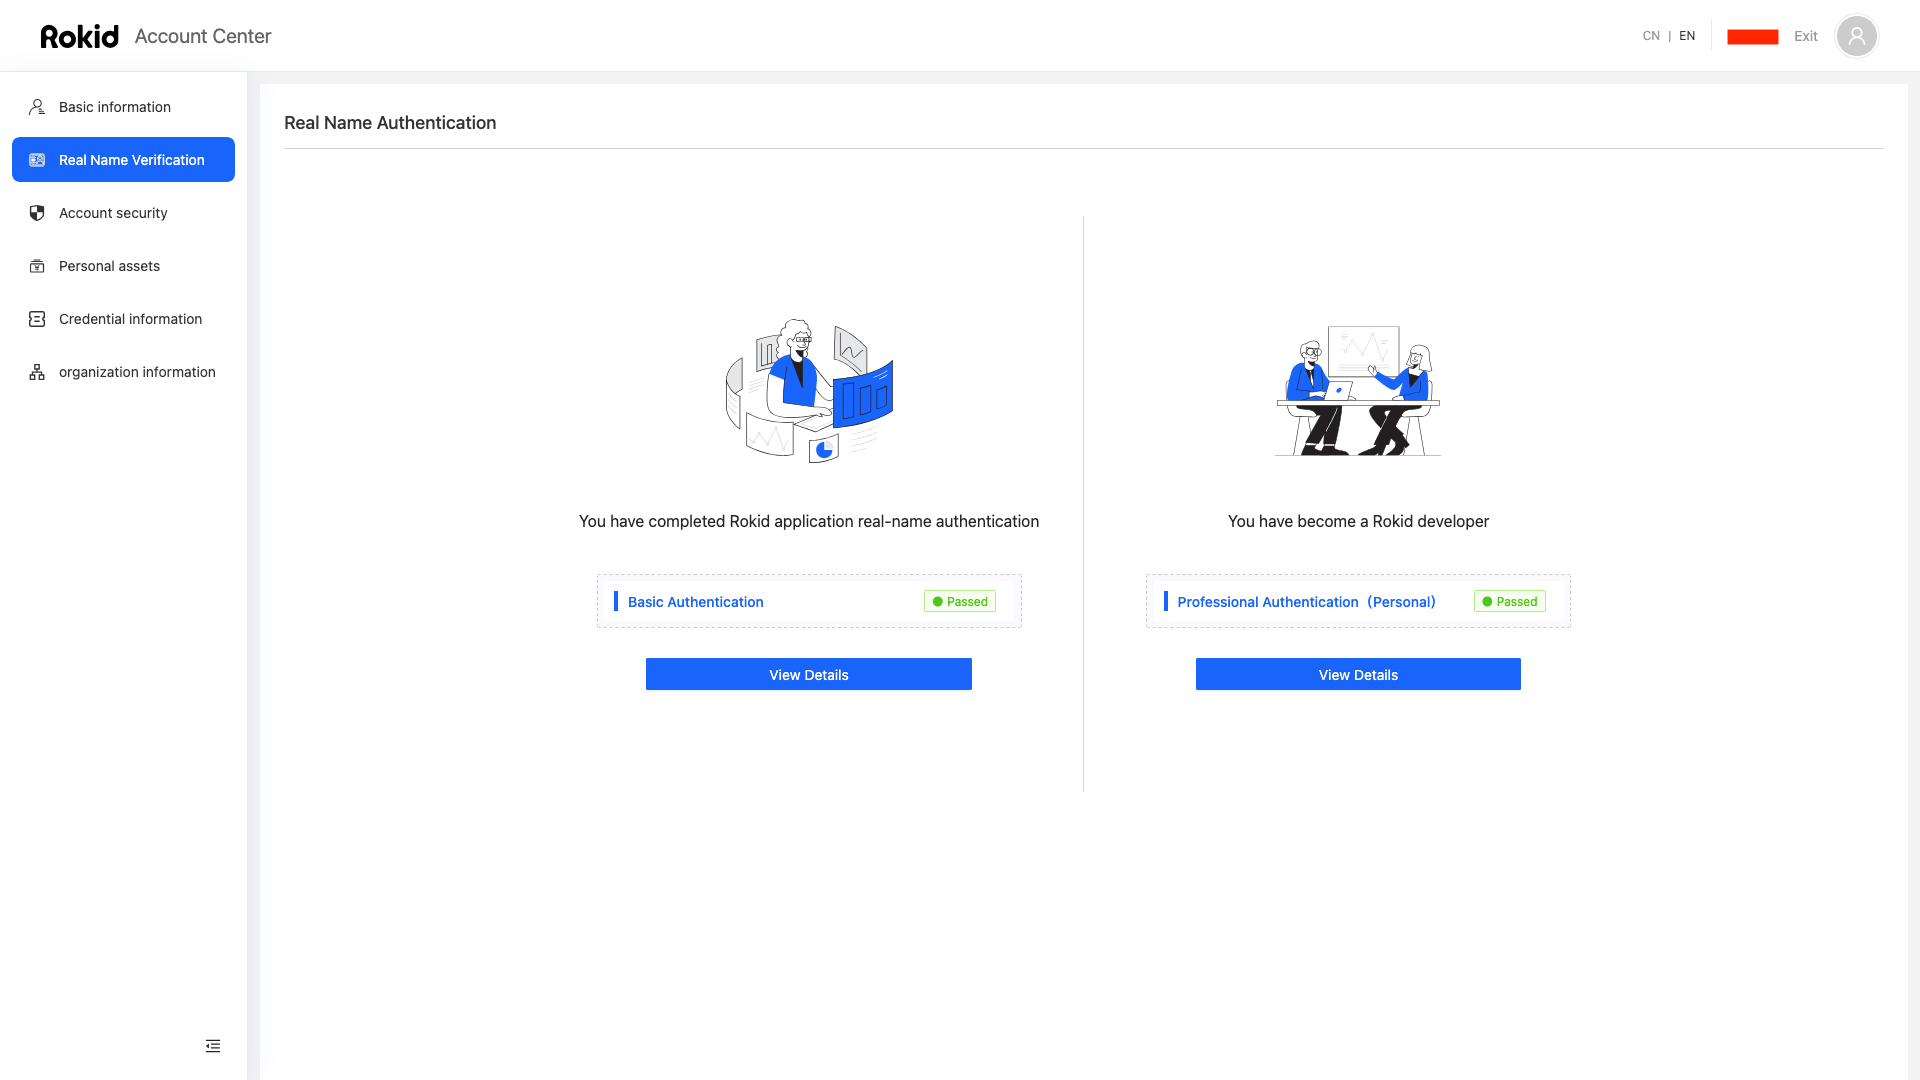 This took ~24hrs to complete in my case.
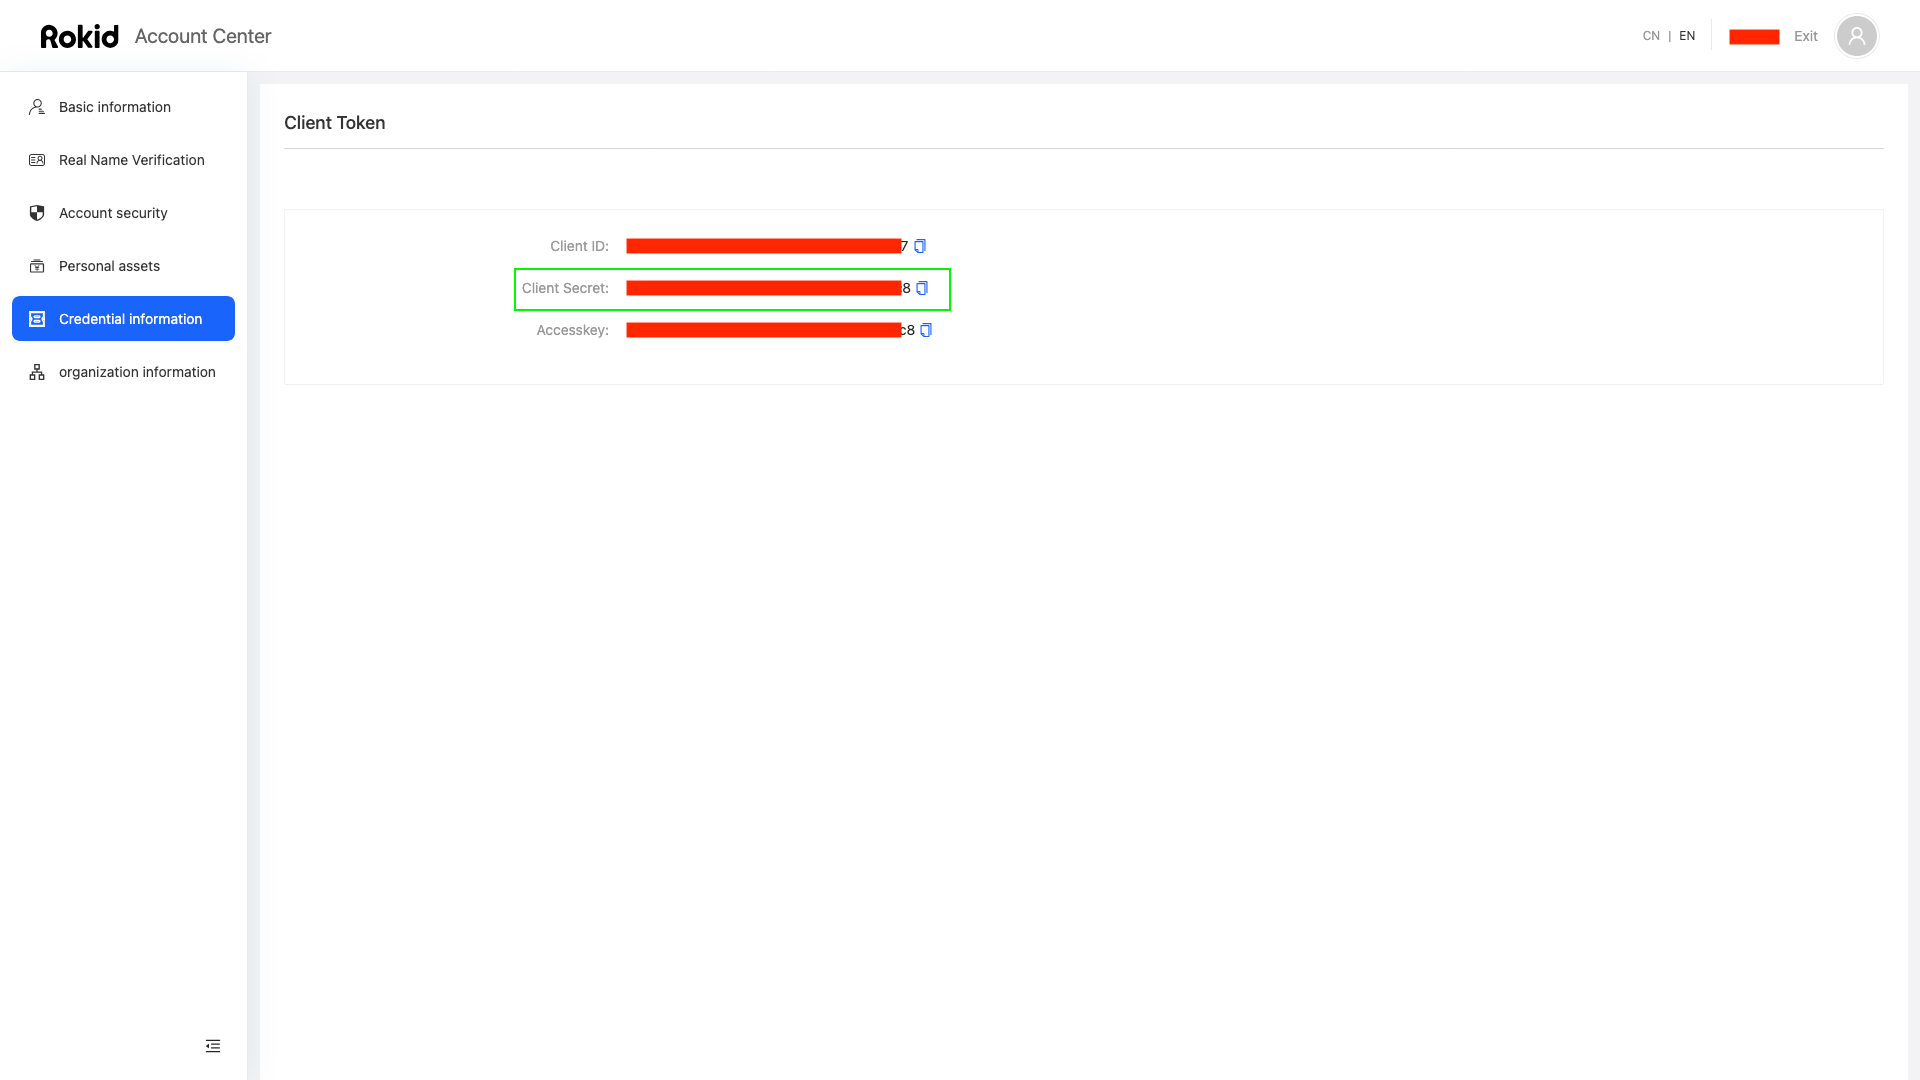
Step 3: Get the Secret Key https://account-web.rokid.com/token
Go to Developer Platform → Account Center → Credential Information → Common Vendor Key Acquisition → GET to get the secret key.
Step 4: Device Management https://ar.rokid.com/control?lang=en
Go to Console → Equipment Management
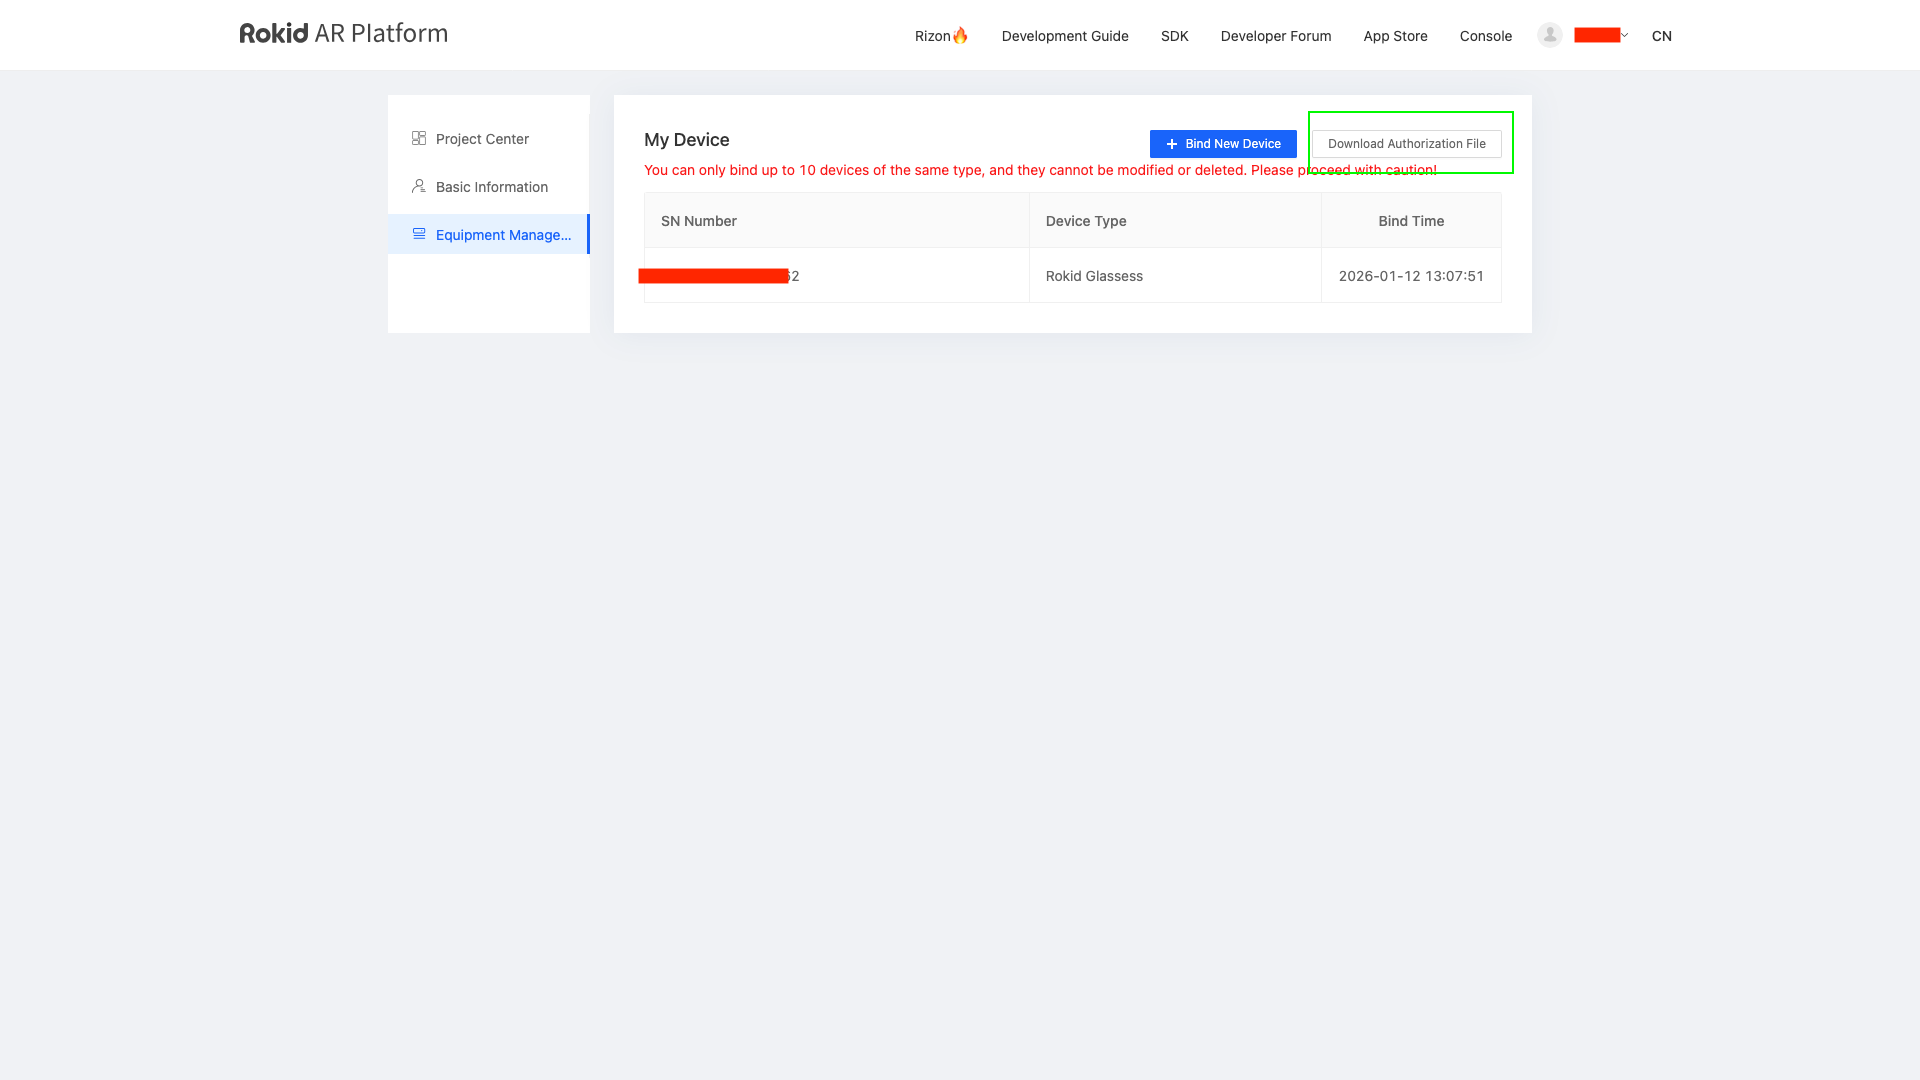
Bind the device (note: device deletion is currently not supported)
Each time you bind a new device, you need to re-download a new authentication file.
Note: For enterprise users (professional certification), the SN needs to be bound through the sales backend.
credits: 胖虎 who originally posted on: https://forum.rokid.com/post/detail/2385